

How To Bypass Garage Door Sensors A Simple 1, 2, 3, Approach
You are here. That means you know what a garage door sensor is and what it does. You are most likely having a problem that has become a big headache for you. We know it is inconvenient anytime your garage door won’t close. Now you just need to know how to bypass garage door sensors…

You are here. That means you know what a garage door sensor is and what it does. You are most likely having a problem that has become a big headache for you. We know it is inconvenient anytime your garage door won’t close. Now you just need to know how to bypass garage door sensors so you can go on about your day. Keep in mind this guide is only if you know for a fact the sensors are the issue. If you are unsure what the issue is call a professional garage door repair company.
What Do Garage Door Sensors Do?
As you have most likely discovered a garage door sensors purpose is to prevent your garage door from closing. Don’t worry. Obviously, you are not the only one. Thousands of homeowners have this issue daily. once you have fixed it once you will practically be a pro. Well, at least at dealing with this simple garage door repair issue.
Sometimes there is a good reason for this. In those cases we actually do not want the door to close, even though we think we do. In those rare instances it is vital that the issue is addressed and that we do not just bypass the garage door sensors.
These scenarios bring us to step one.
Check Garage Door For Physical Obstructions
Your garage door opener is smart enough to not allow it to close when something could become damaged, or worse injured. So the quickest easiest thing you can do is make sure you do not have something blocking the path between the two sensors. Garbage cans, gas cans or even spider webs are all common culprits. If you see something simply remove it and try closing your garage door again.
The Sun May Block Your Garage Door Sensors
One thing that can block the sensors that you may not notice right away is the sun. To determine if the sun is the issue there is a simple test you can do. Simply stand outside of the garage door and use your shadow to cover the garage door sensor. Using your remote (or have someone else hit the wall button) test the garage door. If it closes you have to switch which side the sensors are on. This should solve your problem. You only need a few tools. A pair of wire strippers, electrical tape and possibly a phillips head screw driver and possibly a screw gun.
No Obstructions?
Alright so you have already figured out the sensors are the problem. You hit the button, either on the wall or on your remote. The door starts down, goes back up and the lightbulbs on your opener begin to flash. You made sure there is nothing actually blocking the sensors. Now that we know we can close the door using the opener without damaging anything it is time to actually bypass the garage door sensors.
How To Bypass Garage Door Sensors
First of all, you will only be able to bypass your sensors from the wall button. Sorry, this is not a permanent “hack” of the opener. It will however, work on any garage door opener no matter the brand. It is not a good idea to have sensors that do not function properly. The opener may not be smart enough to know that there is nothing really in the way so we have to convince it we know better. So, all you need to do is hold the wall button down ( do not press and release). You must hold the wall button all the way down until the garage door hits the floor then release. If you let go of the button before the door hits the ground the sensors will kick back in to action and the door will reverse. This will allow you to close the door and have it locked into the down position using the opener. Now at least you do not have to leave the door up all day or night.
Bypassing The Garage Door Sensors Is Not A Garage Door Repair
Once you have bypassed the garage door opener sensors, you have manage to get the door closed. You will even be able to open the garage door with your remote when returning home. However, the problem is not fixed. There is a reason why the sensors are being tripped and we need to figure out why. It always comes down to a few things, obstructions, alignment, wiring, or a faulty sensor. It is best to troubleshoot one issue at a time starting from easiest to the most difficult.
Check The Alignment
First, check the alignment. No matter what brand garage door opener you have the garage door sensors have LED lights on them. LiftMaster will have one green and one yellow light. Genie may have one red and one green or even 2 reds. Chamberlain and Craftsman are the same as LiftMaster. Linear will have a green light on each and a red light on one. To keep it simple, if one light is out check that sensor to start. You may need to play with it a little bit but the goal is to get that light to light up and stay lit solid. No flickering or blinking.
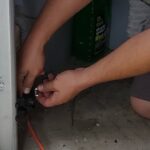
Check The Wiring
The next step if you cannot fix the issue with adjusting the sensor, is to check the wiring. Often times, pets or pests can be to blame. For some reason they love to chew on these wires. Don’t worry your pet will not be harmed. If you see a disconnected wire, reconnect it. When it has been chewed on, try to cut out the bad part and splice the wire back together. Sometimes your wires are behind the wall, then you may want to call a garage door repair company.

Replace The Sensors
Last, if you cannot find a faulty wire you may have a faulty sensor. The sensors can be bought online and installed pretty easily. Just make sure to buy the correct brand and style. It is not a difficult job but if you are not comfortable with basic hand tools, just call your local garage door repair company and book an appointment!

